Have you ever encountered write Protection warning that that pops up when you insert an SD card into devices such as computer, digital camera,etc, and could not find a solution to it?
In this post you will find out:
why you cannot format the write-protected SD card
methods on how to remove protection from a memory card
how Disk Internals software can help you
What does it mean, if an SD card is write protected?
This may happen every time: you insert an SD card to the adapter in your computer/laptop, digital camera, etc and you can view and read all the files located on it, but this is all that you can do with this SD card.
You will find it impossible to add anything, and you cannot format a write-protected card. Below are the possible reasons and solutions to why an SD Card is write protected.
Reasons and Solutions:
1. SD card is write-protected for physical reasons
SD card is write protected because of switcher
Here, the switch that protects the SD card from being overwritten is active.
To fix it, disable the lock. On each SD card on one side, there is a switch, which needs to be shifted in the opposite direction and then the SD card can be reconnected to the computer.
Did this method for removing write protection from an SD card not help you? No worries since there are many other solutions to the situation.
2. SD card write-protected due to software
This situation may occur due to read-only attributes.
To fix it, delete them using the command line.
Press Win + X at the same time; you will see a cmd window where you need to type "diskpart" on the keyboard and confirm pressing Enter.
Then enter the command "list disk" and press Enter.
Disks connected to the system will appear in a new window. Select your SD card (you can find it by the appropriate disk size; for example, drive 0).
Next, in command Prompt, type: "select disk 0", then press Enter.
Next, enter the attributes. "disk clear read-only command" and press Enter.
These actions will remove the attributes and remove write protection from your micro SD card.
4. Write protection is gone but so is the data
This is due to improper use of the diskpart utility. (Sometimes instead of removing the write protection, users format their SD cards). And, as you know, due to the formatting, all data is lost.
To fix it, use DiskInternals Partition Recovery. This application recreates the file system on the SD card, so the files can be found and restored. It recovers any file: photos, music, videos, documents, etc. You can also not worry about large files: the application can handle even them. It has been designed to satisfy user's needs without fail:
There are three recovery wizards that will explain everything to you step by step, depending on your file system: Partition Recovery Wizard, NTFS Recovery Wizard, and FAT Recovery Wizard.
There are several scan modes (fast, full).
There is a free file preview for assurance.
There is a trial version at no cost; you only need to pay if you want to save the recovered files to any disk visible to the system and with unshakable technical support.
A high-performing website requires constant maintenance. This, in return, helps your rankings to grow, your conversions to improve, and your visitor traffic to increase. That’s why even the most experienced web developers will admit that a website’s work is never truly done.
So if you’re a web professional, small business owner, or even a solo blogger, don’t overlook your website’s need for speed. In order to keep your website’s performance in tiptop shape, even if you use Shared Hosting, read below to learn how to make your website load faster.
Procedures on How To Make Your Website Load Faster
Measure Your Website’s Loading Speed
Firstly, you need to determine the current state of activities on your website by taking a look at what exactly takes so much time to load.
To help you do this, there are several website performance evaluation tools that you can use, such as:
A good rule of thumb? If the tool indicates that your website takes 3 seconds or less to load, you’re in good shape. If it takes longer, it’s worth investigating the root cause. These tools are ultimately designed to show you the loading process for your website, each HTTP request made, and will offer recommendations on the critical aspects, if any. Oh and don’t forget to backup your website and database files before proceeding with any changes to your website itself.
Be Sure It’s Not Hosting Issue
If your website seems to be loading very slow, this may be the result of shared server space or your website’s hosting provider. The latter might not be equipped to handle your content management system (CMS).
The easiest way to test if the problem is actually with your hosting is to create a subfolder in your website’s root directory with an empty index file. From here, you’ll want to run a test of your website’s loading speed by using the empty webpage’s URL. This is a quick and easy way to test if the issue is indeed with the server response time or with your website’s optimization.
If the empty webpage takes forever to load, we recommend reaching out to your server administrator or your respective hosting provider to check for any backend issues. If they identify an issue and confirm that they’ve sorted it out, run the test again but now with your actual website’s URL.
If your website happens to run on WordPress, consider Managed WordPress Hosting. Fully optimized for website speed, this helps solve a variety of issues that could be slowing down your website.
Start Optimizing Your Content
Try taking a look at your website’s content, which may or may not be properly optimized. In this case, when we refer to optimization, we’re mainly talking about images and media content.
So, how do you optimize your content? Here are a few ways:
To reduce image size, without compromising on quality, try compressing. Luckily, there are plenty of website plugins and mobile apps for image optimization, such as Kraken.io, Imagify and LitPhoto. If you use cPanel, the “Optimize Website” function also works well.
Make sure to load images directly to your server. This gets rid of any unnecessary HTTP requests to load your images from another source.
Deliver the proper image size for your user’s screen. Remember that wasted pixels add unnecessary weight to your website.
Check for Any Unnecessary Plugins, Widgets and Themes
The more plugins, widgets and themes you have in your backend, the more likely this will slow down your website. If you do happen to have quite a few in your arsenal, try disabling the ones that your content is less dependent on to see if it makes any difference. You can also try checking each individual theme and/or plugin, one at a time, to figure out which one might be dragging your website down.
This is also the time to check and see if your plugins and themes are up to date, version-wise. If you’re comfortable with coding, you can also consider this an opportunity to create your own code to see if that helps with slow loading times.
Consider the Cache
Picture this usual scenario. Every time your website loads, it needs to find the files and data that make up each particular page.
This is where something called “caching” comes into play. Caching is that process where commonly-requested data is stored locally, either on your server (server-side caching) or your website browser (HTTP caching). Caching frequently accessed data points on your local machine essentially means that your website doesn’t waste any precious time searching for each one.
So depending on which server type you’re on, don’t forget caching. If you use Shared Hosting or Managed WordPress Hosting and your abilities are limited, try browser caching. Website browsers use a cache that reduces the number and size of HTTP requests, making web pages load even faster. We suggest adding the expires header rule to your .htaccess (if you’re using website hosting on an Apache web server) in order to tell the browser how long your web page contents should be kept for.
Minimize Your CSS and JavaScript Dependence
Remember that website browsers will not render any processed content and load the page of your website until it loads the CSS first. What’s CSS, you might ask? Short for Cascading Style Sheets, CSS brings style such as fonts and colors to your web pages by interacting with HTML elements.
So the bigger your styles are, the longer it takes for any web page to come up. Things like comments, whitespace, and indentation are all unnecessary CSS characters that can slow your website down. Think of this as your opportunity to check which parts of your CSS code can be safely removed, without causing any issues to your website. We suggest contacting a web developer for personalized help or using an external tool like CSSNano.
Javascript is also worth taking a look at, since most likely you’ll see Javascript files in your website’s speed report showing that it took too long to load. This can be done by reducing the size of your JavaScript files, so check out a tool like Closure Compiler for that.
Use a Content Delivery Network (CDN)
A CDN, short for Content Delivery Network, is a group of servers distributed around the world to cache (store) and deliver assets such as images and video to your website visitors faster. When someone visits your website’s homepage, this content gets loaded from the nearest CDN server, while the rest gets loaded from your server. This, in effect, speeds up page delivery for your website.
The main goal of a CDN is to offload the bandwidth strain on your original server to somewhere else. This is often the server that’s closest to the website visitor who is trying to load your website in the first place. While a CDN certainly doesn’t replace your hosting provider, it does take your website to the next level. While Namecheap’s Shared Hosting plans support CDN services such as CloudFlare, we recommend Supersonic CDN from Namecheap, which delivers your website content at up to 68% faster speeds.
And sure, maintaining your website takes work but it’s worth it. When you understand why website speed is so important and that it supports a healthy business, you won’t mind so much to keep a constant eye on its performance and ranking.
Do you have any other tips that we forgot to mention? Share with us below!
How To Activate SMADAV 2022 Pro With Free Lifetime Registeration Keys
SmadAV is an additional antivirus software that is designed to protect your computer.
1) Additional protection for your computer, 100% compatible with other antivirus software! Works with your primary antivirus as an extra layer of defense.
2) Best USB Antivirus (Total Protection USB drives)Prevent viruses that spread through USB stick drives.
3) Best for offline use (no need to update very often) Designed to be used with computers that are rarely or not even connected to the internet. SmadAV does not need to be updated as often as other antivirus. (Regularly updates once a month).
4) Cleaner and tools to clean the virus. SmadAV not only removes viruses but can also fix registry problems in infected machine.
Smadav Latest Version
Smadav 2022 Rev. 14.1 is the latest version of smadav and it's updated features include:
New detection database of 70000 new viruses,
New Smadav AI update to reduce false detection
Improvements to the auto-update feature,
+ Reduction of virus databases for efficiency.
Benefits Of Using Smadav Pro
Smadav antivirus comes in two form; Free users and Pro users. The Pro users have more advantage than the free users because of the more accessible security features on the pro smadav. The free users enjoy almost everything pro users enjoy, but the annoying part of using smadav free is the Splash screen display that comes up few seconds after you turn on your computer. This slows down the system for the first few minutes of booting your computer and it can only be stopped by upgrading to a Pro account.
Upgrading to smadav pro requires the use of serial key or activation key which is bought with real money form smadav official website.
In this post, I'll be showing you how you can activate smadav pro for free and it's a lifetime activation. This means you that the activation has no expiry date, even if you update the smadav. If by any means the smadav pro goes back to free user due to the fact that you updated the app, don't be afraid, just try the step below again and you will be back to Pro. It works everytime.
How To Activate Smadav 2020 Pro With Free keys
1. Download Smadav antivirus for your system Here.
If you already have the latest smadav antivirus, move to the next step.
2. Open Smadav antivirus software and navigate to Settings.
3. Fill in the "Name & Key" section with the free keys provided below
4. Click Register.
This activation does not require the use of internet connection.
Smadav Pro Free Activation Keys
Free Smadav keys to upgrade to PRO Version
New Working keys for version 14.1
Name: -MAX08
Key: 995299250540
NAME: mobilarian.com
Key: 085800313575
NAME: mobilarian.com
Key: 771277313575
NAME: mobilarian.com
Key: 991299313575
All keys are working perfectly fine.
Let us know if these keys worked for you by commenting below. This a way of giving me feedbacks and encouragements concerning each post I make. Don't forget to use the Social media buttons below to share this post to your friends and followers.
Join our telegram group chat. Hacked Apps & Games are posted daily. Don't miss out.
Different Ways To Fix Unfortunately App Has Stopped Errors On Android Devices
There is one problem that burdens beginner and advanced Android users, which is the cursed foremost Unfortunately, (app name) has stopped error message. This error message usually appears when you're in the middle of using an app, and then forces that app to close. Annoying, right?
Fortunately, there is a way to stop it.
Here's How To Fix Unfortunately, App has stopped errors.
Clear out the App's Storage
This problem often arises with the contacts, gallery and launcher apps.
The procedure to fix this is generally always the same.
First, navigate to Settings on your device.
Go to Applications Application manager, Swipe left until you find the All tab.
Scroll down to the app that's causing problems and tap on it. Here you will find the Clear data and Clear cache options.
It will get rid of saved data that allows apps to load a little quicker when you launch them.
Clearing it means the app will open a little slower, but your main problem might well be solved.
Clear data, will erase all the app's data, including files, settings and accounts, so don't use this unless you have to.
Clearing an app's cache can often solve the 'app has stopped' problem.
Uninstall and Reinstall the App
If the app isn't built-in, you can also try uninstalling it and then reinstalling it from the Google Play Store.
Simply open the Play Store app, open the menu bar on the left hand side and tap on My apps.
Find the app in question and hit Uninstall, which takes a few seconds. Atterwards, you can install it again.
Restart Your Phone
You can also try doing a soft reset, which simply means restarting your device.
This is super simple and quite effective if your phone has been on for a long time.
A soft reset will power cycle your phone, turning it off and then back on again.
It’s a very good idea to turn your phone off every few days for a few minutes – this will help a sluggish phone with a variety of issues, whether they're related to the app, network, audio or email.
FINAL OPTION,
Factory Reset
When the above solutions have failed, you can resort to factory reseting your phone.
When doing a factory reset, ensure that you have backed up all of your data beforehand. This means moving all your files such as pictures, music, videos, documents and contacts to a separate storage device or another phone.
A factory reset will wipe your device and set it back to factory defaults, taking everything, including any bugs, with it.
You can restore your apps and data afterwards easily, as long as you've made a backups
These methods will surely solve the problem of "App hast stopped" errors.
If the above steps doesn’t solve the problem and error pops up again, it means that either the application is written with an error or is not compatible with your phone nodel and it is rather impossible to cope with it – you just have to wait until the next version of apps is bug free or you uninstall the app completely.
In case you are having issues following any of the steps above, kindly let me know in the comment box, or if you solved the problem using a different method that's not in this post, pls do well to share with others how you did it. Make sure you comment below so that we can all learn together
The source code is the programming behind any website or software. In case of websites, this code can be viewed by anyone using various tools, even your web browser itself. However, for this post we will be making use Google Structure Data Tool
At the "Fetch" section, input the URL of the website you wish to view it's source code
Click "Run Test"
The source code of the website will show up immediately.
You can also view the source code using your PC browser. Here's how to do it:
Firefox – CTRL + U (Meaning press the CTRL key on your keyboard and hold it down. While holding down the CTRL key, press the “u” key.) Alternatively, you can go to the “Firefox” menu and then click on “Web Developer,” and then “Page Source.”
Internet Explorer – CTRL + U. Or right click and select “View Source.”
Chrome – CTRL + U. Or you can click on the weird-looking key with three horizontal lines in the upper right hand corner. Then click on “Tools” and select “View Source.”
Opera – CTRL + U. You also can right click on the webpage and select “View Page Source.”
Reasons for viewing website source code
For troubleshooting if you have a problems with your website, it is ential to look at its source code. You can also see any website's source code for educational purposes, and see how it works.
The page source is also very useful when you are doing search engine optimization, or SEO. A search engine only sees the website's source code. Even if your web page looks perfectly fine to you, it may not match the standards required by a search engine crawler. Make it a habit to look through the code, especially the important header tags, such as title, and description.
Solution To Blogger Post Image Thumbnail Not Showing On Homepage
On this post, I'll be showing you the solutions to post image thumbnail not showing on your site/blog homepage. There are two solutions to this issue. The first solutions will definitely solve your problem while the second solution must surely solve the problem.
I would have loved to share my story on how I was able to come up with these solutions after going through a lot of research, but I guess it might not be necessary, so let's get straight to the point because I love going straight to the point.
After creating and publishing a post, and you find out that on the homepage, the image thumbnail didn't load or show, then you should know there's problem somewhere. Now let's fix this problem.
Method 1.
Go back to the post editor and click on the "html" post editor which is located at the top left corner.
Look for the part which contains the html code for the image you upload (usually the first image, if you uploaded more than one image in the post)
Locate the link where the image is sourced from and change src="https:// to src="http:// (I simply removed the "s" from the first one) and also try doing the same to every link address located in the image html alone and update the post. This should work, but if it doesn't then method must surely work.
How to boot phone into recovery mode. Successfully tested on Gionee S10 lite.
Recovery mode is the hidden mode On Android where you can perform actions like Hard reset, wipe cache partition, update android version and so much more.
Follow the steps below to successfully boot your phone into recovery mode.
Does your Smartphone battery die quickly and you don't know how to save it? Well check out few of the tips below to increase the battery life.
1. Pretend you are on a plane . The airplane mode is actually the most efficient when it comes to energy. When you turn it on, most of the battery-consuming processes are switched off. That is why when you charge the device in that mode, it should charge up a little bit faster than in the usual mode. The ideal thing would be to turn your phone off when you are not using it however if you cannot do it, the airplane mode is almost just as good.
2. Use the producer's charger
Usually the charger which you are given together with the device charges your phone the quickest. Charging by USB cable may be universal but they use less than 1 amper and the modern devices usually need 2 ampers or more. Simple math - the fewer ampres, the slower charging. That is why we recommend using the original charger. If you do not have one, there are special chargers which you can buy that have more than 2 ampers - remember to always check that parameter when you decide to purchase a new charger. In this case, Apple device are more thought through and it does not make much of a difference which charger you use with them.
3. Make use of Battery savers On the App market you can also find some applications- for example ChargeDr. They will help your device charge faster when you connect them to a laptop. We also recommend outer banks of energey (now very popular power banks) which will save your device in cases of emergency.
In Android Smartphones, "Unfortunately, The application has stopped" is one of the most common errors that we can see on the screen of our device. Here's How to deal with such an error?
Firstly, in accordance to the fundamental principle of work on any electronic device, in case of problems, the equipment must be turned off for one minute and then switched back on.
If that does not work, go into your phone Settings. Then select the Application manager and select the one that causes you trouble. Afterwards you need to perform Clear Cache and Clear Data. This method theoretically should solve mentioned issue.
If after attempting the above steps and the error continues, the final attempt to win the fight against persistent error may be of course the removal of all data from your phone to factory reset ; this means we lose all the data, applications and settings, but the smartphone will be "brand new". How to do it?
If the above steps don’t solve the problem and error pops up again, it means that either the application is written with an error or is not compatible with your phone nodel and it is rather impossible to cope with it – you just have to wait until the next version of apps is bug free or you uninstall the app completely.
Do you have any problems you want us to solve for you, kindly drop it In the comments box and I'll be here to assist you.
Also drop your testimoniea below, if the solution worked for you.
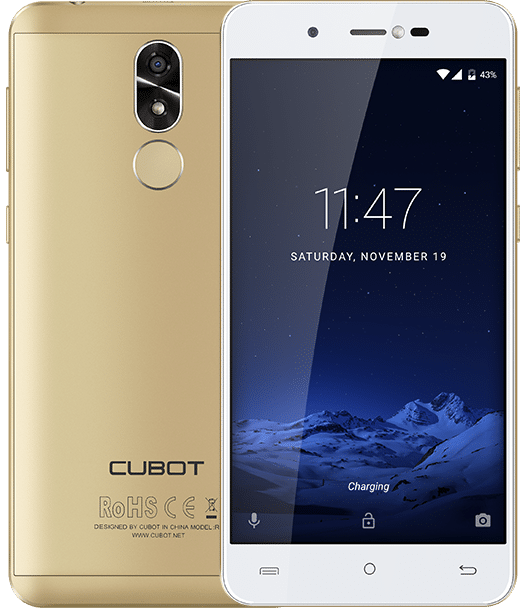
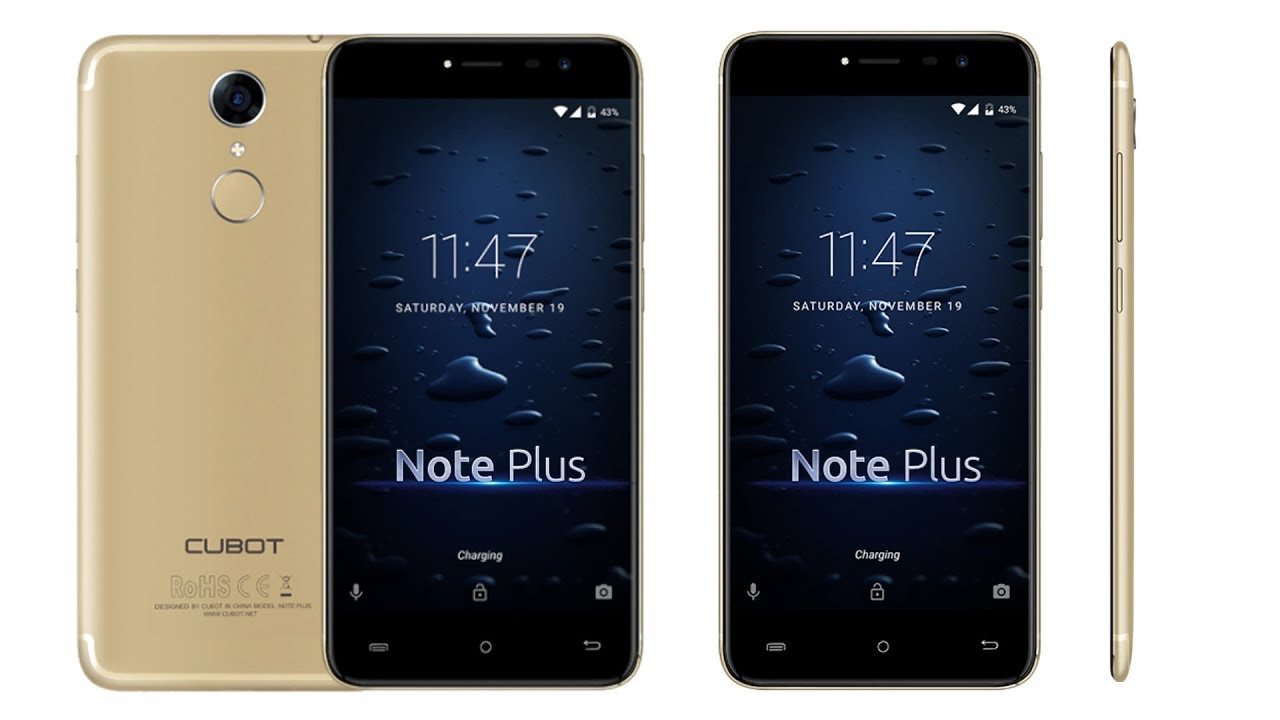
*. Android 7.0
*. Processor: MTK6580A Quad-core 1.3GHz
*. RAM: 2GB RAM
*. Memory storage: 16GB ROM, Misium Extended storage up to 64GB.
*. Support 2G network: GSM: 850/900/1800/1900MHz (B5/B8/B3/B2)
*. Support 3G network: WCDMA: 900/2100MHz (B8/B1)
*. Display: 5.5 inch 2.5D curved HD Infinity display with LTPS Tech, bring you a perfect vision.
*. Camera: 13MP+5.0MP has enhanced cameras and 2 flashlight, which brings you better and clear selfies.
*. Sim: Dual SIM Dual Standby( 1Micro SIM Card+1 Nano SIM Card+1 SD Card )
*. Fingerprint: Yes (0.1s)
*. Battery: 3000mAh Li-ion Battery
*. Other Functions: Bluetooth, WIFI, GPS, AGPS, OTA, FM, Smart wake and etc.
*. Price: N27k – N30k
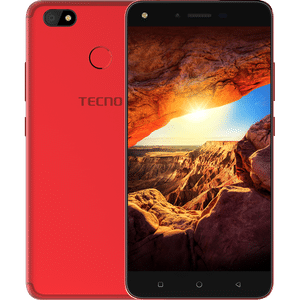
Tecno Spark K7
*. Fingerprint: Yes
*. Camera: 13MP F/2.0 Back Camera with 5MP FF and flash
*. Screen Size: 5.5-inch HD 1280*720px Touchscreen
*. 16GB ROM expandable Micro SD, up to 32GB
*. RAM: 1GB/2GB RAM
*. Processor: 1.3 GHz Quad-Core Processor
*. Battery: 3000 mAh Battery
*. OS: HiOS based on Android 7.0
*. Price: N30k